The Ship Express integrated shipment management module provides a complete multi-carrier shipping solution designed to automate your shipping workflow. Ship Express was designed to improve the efficiency of your shipping workflow by eliminating double entry of shipping information and manual data entry errors with an easy-to-use shipping management solution to manage freight costs and boost profits. As a hosted solution, Ship Express reduces IT overheard while providing a single integrated workflow for access to all supported small-parcel carriers and provides automatic real-time updating of all freight charges, tracking numbers, and other shipping data for your site. The rate shopping feature lets you quickly compare shipping rates across all carriers and select the option that will maximize your profits.
Ship Express is available in the United States, Canada, and the United Kingdom.
You can access the shipping management administrative pages from the links in the Shipment Management section on the Administration home page:
Ship Express integrated shipment management
is a licensed option.
●
For information on obtaining
a license for shipping management, please contact your sales representative,
call (855)-334-4457, or complete the Web form at https://epssw.com/contact-us.php.
Follow the steps below to verify that your site is licensed for shipping management.
1 Go to Administration > License.
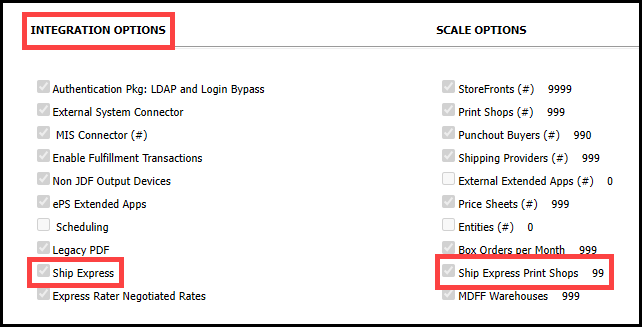
2 On the License page:
● Scroll down to the INTEGRATION OPTIONS section and verify that the Ship Express option is selected. When the license is enabled, you can add a shipment system and associate it with a Print Shop.
● Scroll down to the SCALE OPTIONS section and verify that you have the correct number of Print Shops licensed for Ship Express in the Ship Express Print Shops field.
This license controls the maximum number of Print Shops that can be associated with Ship Express. There is one-to-one mapping between a Print Shop and the Ship Express system. So once a Ship Express system is mapped to a Print Shop, it cannot be mapped to any other Print Shop in your system.
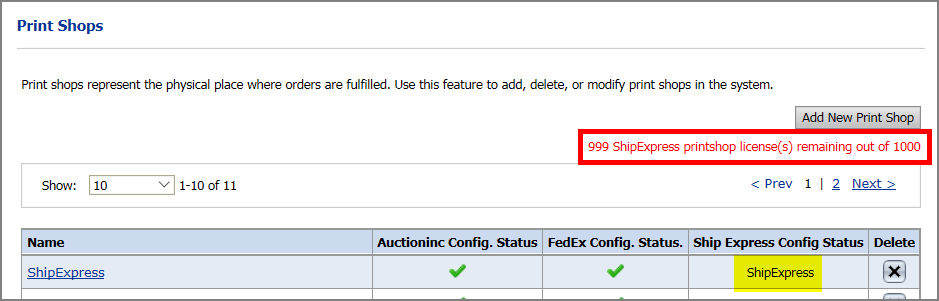
A
message on the Print Shops
page will indicate the number of Ship Express Print Shop
licenses that are available as well as the Print Shops
that are configured for Ship Express (the Ship
Express Config Status column shows
the name of the associated Ship Express system).
1 Go to Administration > Manage Communication Channels.
The Manage Communication Channels page lists details about the communication channel configuration for your site and provides a table containing all available communication channels.
2 To create a new communication channel, click Add New Channel.
● In the Type field, select eFlow if your MarketDirect system is self-hosted or select Super eFlow if your MarketDirect system is Graphic Communications hosted.
If you have a Ship Express license
but no MIS license, only eFlow and Super eFlow options will be available
in the Type list. If you have
a licensed MIS integrated with your system, additional options will be
available.
Select eFlow if both your MarketDirect
system and Radius are Graphic Communications hosted or
if both are self-hosted (customer-hosted).
● Enter a Name (containing no more than 11 characters) and optional Description for the communication channel.
After you register the communication
channel, the system adds an _ (underscore) followed by the site GUID (an
identifier for your MarketDirect system installation) to the Name
you entered. This will make it unique in the hosted environment.
If you enter a name with more than 11 characters, the extra characters
will be removed.
3 In the Configuration URL field, enter the URL of the eFlow server.
For Graphic Communications hosted installations, this will be provided to you (i.e., https://eflow.myprintdesk.net/bigfish/htcserver.ashx?view=home).
The system currently supports HTTP for the eFlow URL. (HTTPS is not supported.)
4 Click Check Status to make sure you can connect to eFlow.
5 Click Register.
After the communication channel is setup, you will
need to do the following in Ship Express:
●
Setup the Configuration > eFlow Clients
tab in the Administration
section. You will need the Configuration URL of
the MarketDirect StoreFront
communication channel to do this properly.
●
Setup the ToolKit > ToolKit Configuration
tab in the Administration
section. You will need the Name of
the MarketDirect StoreFront
communication channel to do this properly. Also, take note of the
Subscribe Topic Name and
Published Topic Name fields in Ship Express, because you will
need them when you add a new shipment system to MarketDirect StoreFront.
1 Go to Administration > Manage Shipment Systems.
2 On the Manage Shipment Systems page, click Add New Shipment System.
3 Configure the new shipment system to open the shipment system registration page:
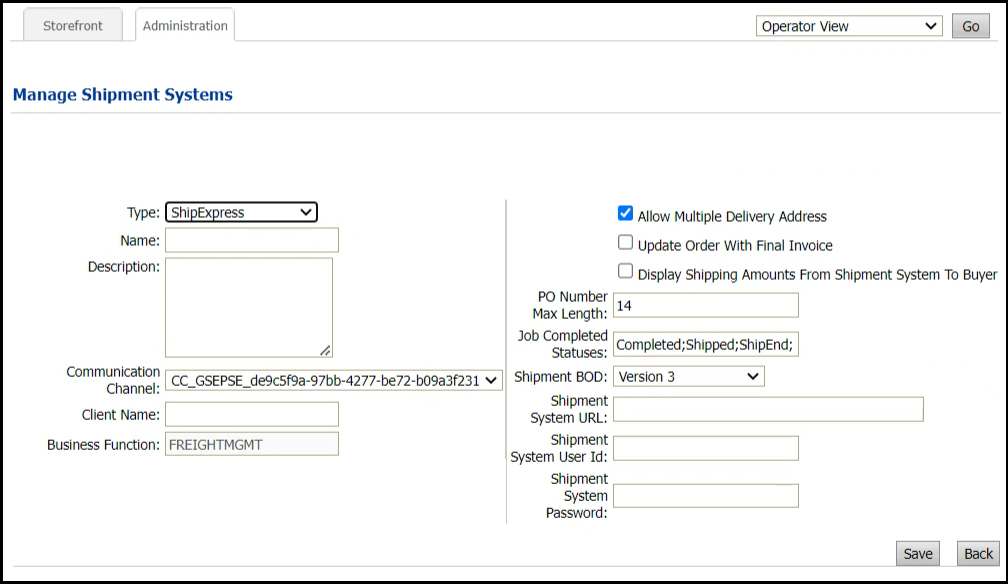
● Type: The default shipment system type is ShipExpress.
● Name: Specify a name for the new shipment system.
● Description: Add a description to help you identify the shipment system (useful if you have more than one system used for different purposes).
● Communication Channel: Choose the eFlow communication channel you created for the shipment system from the drop-down list. The eFlow communication channel is available in the Publish Topic Name field on the Toolkit Configuration page in Ship Express.
● Client Name: This is the ShipExpress identifier, which must match the Subscribe Topic Name field on the Toolkit Configuration page in Ship Express.
● Business Function: Enter FREIGHTMGMT.
● Allow Multiple Delivery Address: Select this option if you want to allow buyers to add multiple delivery addresses / recipients for a single order.
When a buyer adds multiple delivery addresses for a single order, the system will send multiple shipment BOD (one for each delivery address) to Ship Express.
BOD, or Business Object Document, is an XML message architecture that is used to communicate business data between applications or organizations, such as ShipExpress.
● Update Order With Final Invoice: Select this option if you want the order to be updated with the shipment charges sent from Ship Express.
If you do not select this option, the shipment charge will be shown in the Admin Order Summary along with the Shipment Package details.
● Display Shipping Amounts From Shipment System To Buyer: Select this option if you want the shipment charges to be displayed in the Buyer Order Summary.
● PO Number Max Length: Specify a maximum length (in characters) for POs.
● Job Completed Statuses: Specify the job complete statuses, such as Completed, Shipped, ShipEnd, etc. separated by semi-colon ( ; ).
● Shipment BOD: Version 3 and Version 4 are supported.
● Shipment System URL: Enter your shipment system URL in this format: http(s)://<domain name>/<Virtual Dir> (e.g., http://ShipExpress.myprintdesk.net/ShipExpress).
● Shipment System User ID: The default is admin.
● Shipment System Password: Specify an administrator password for the shipment system (i.e., it will be encrypted).
4 Click Save.
1 Go to Administration > Print Shops.
2 On the Print Shop page, scroll down to the Shipment System section.
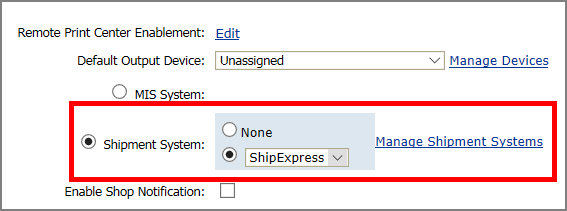
3 To associate a shipment system with the Print Shop, select Shipment System.
4 This will open the shipment system selection panel:
● None: Click if you want no shipment system associated with the Print Shop.
● Select a shipment system from the available systems in the pull-down list.
There is a one-to-one mapping relationship between Print Shops and shipment systems. This means that each shipment system can only be associated with one Print Shop.
You can click Manage Shipment Systems to open the Manage Shipment Systems page where you can view, add, edit, and delete shipment systems.
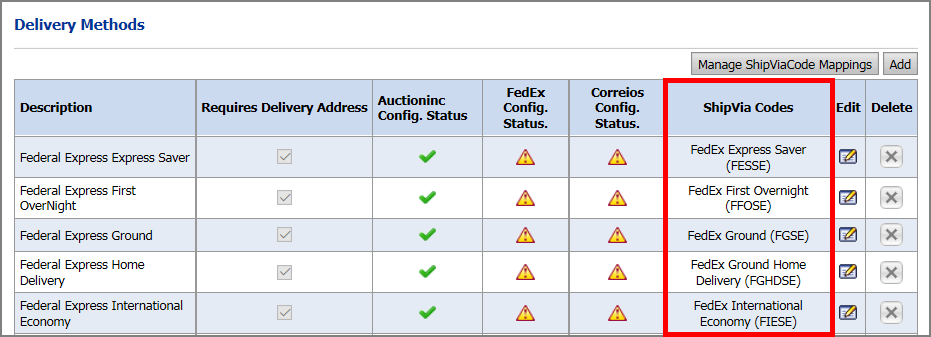
ShipVia Codes are codes that map delivery methods with the carrier, service, account details, packaging type, etc. in Ship Express. For proper integration with Ship Express, you must map your delivery methods to ShipVia Codes on the Delivery Methods page.
If no ShipVia Codes are mapped, Ship Express will show the default shipping details (Carrier, Service, Account, etc.) configured at the Print Shop level.
The system ships with a default list of ShipVia Codes you can use. By default, all default shipping methods are mapped to default ShipVia Codes in Ship Express (provided they are supported by Ship Express).
To view ShipVia Code Mappings for delivery methods
1 Go to Administration > Delivery Methods.
2 On the Delivery Methods page, review the codes associated with the delivery methods in the ShipVia Codes column.
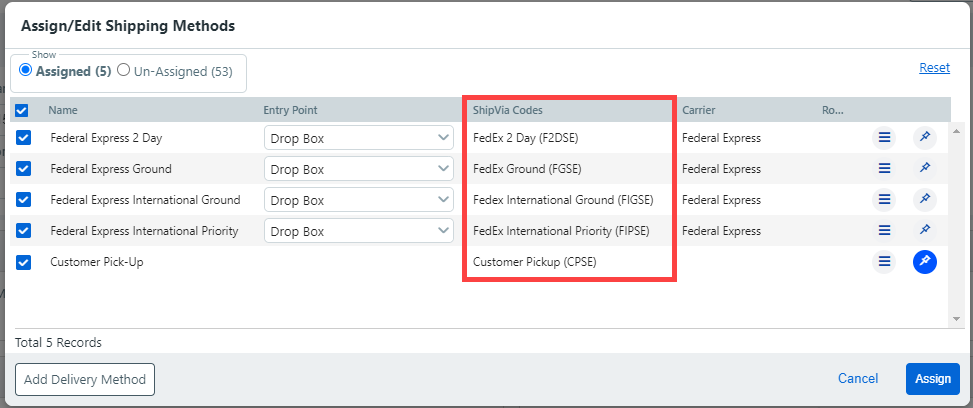
When you assign or update delivery methods
for a Print Shop, company,
or department, the ShipVia Codes will be shown in the Assign/Edit Delivery
Methods window:
To map an existing delivery method with a pre-defined ShipVia Code
1 Go to Administration > Delivery Methods.
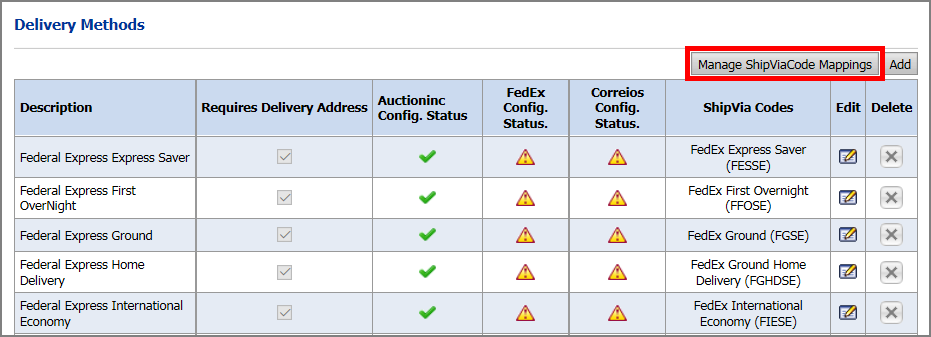
2 On the Delivery Methods page, click Manage ShipVia Code Mappings to open the Manage ShipVia Codes Mapping page:
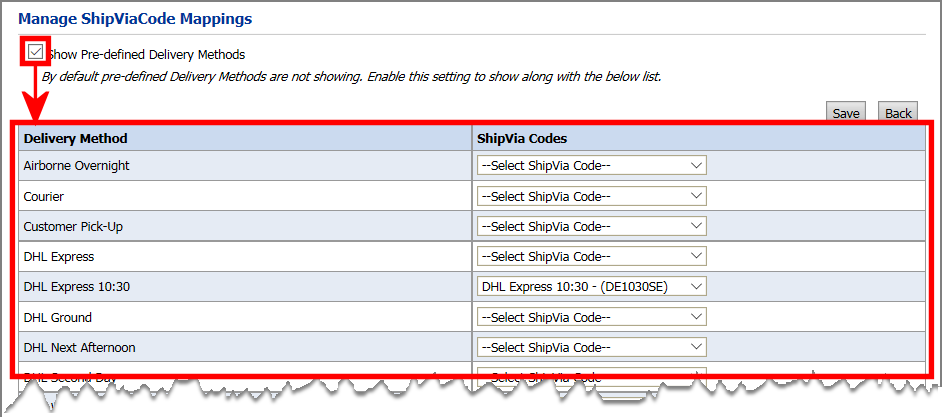
3 Select Show Pre-defined Delivery Methods to show the pre-defined mappings.
4 Open the Select ShipVia Code pull-down menu and choose the code to map the delivery method to.
5 Click Save.
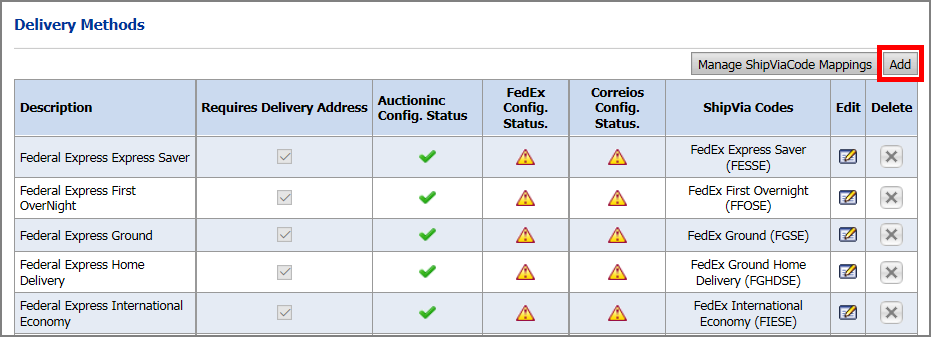
To map a ShipVia Code to a new delivery method
1 Go to Administration > Delivery Methods.
2 On the Delivery Methods page, click Add.
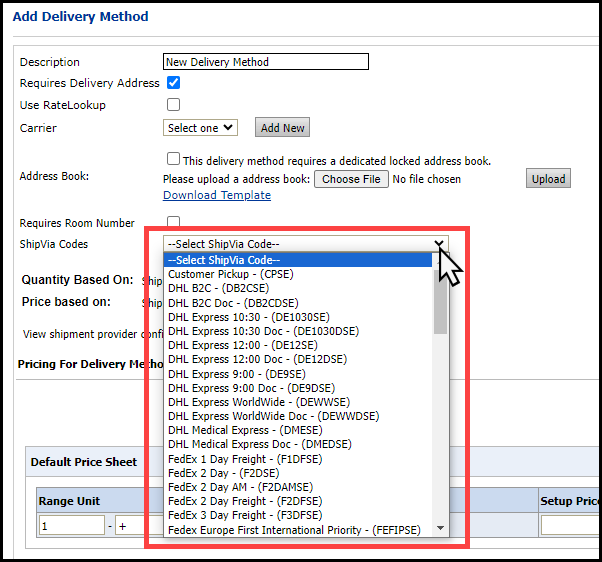
3 To map the new delivery method to an existing ShipVia Code:
● Open the ShipVia Code pull-down list and select the appropriate code for the delivery method.
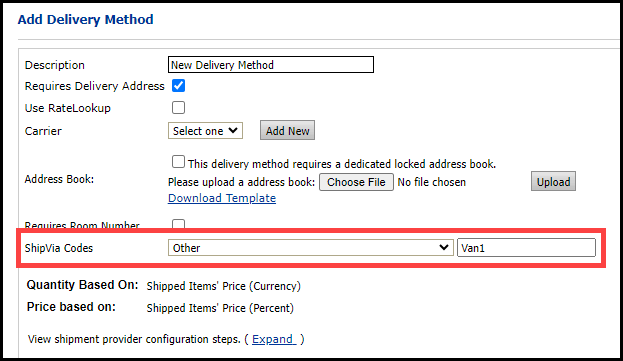
4 To create a new ShipVia Code to map the delivery method to:
● Open the ShipVia Code pull-down list and select Other.
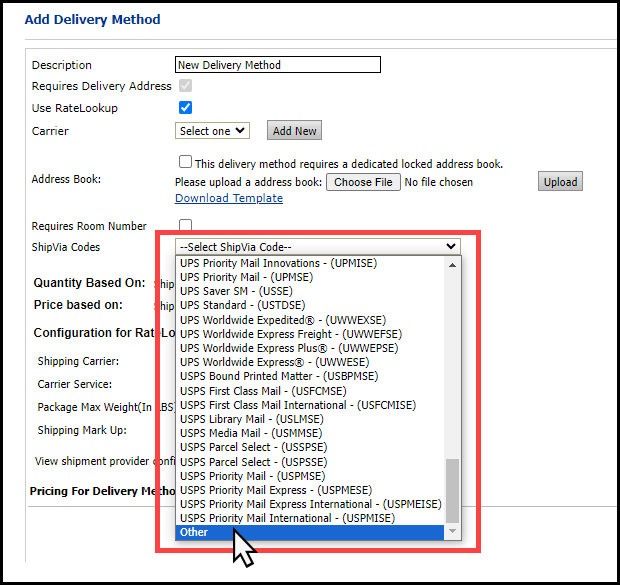
● In the text entry box, specify a name for the new ShipVia Code.
5 Finish setup or editing the delivery method following the steps in the help topic on Delivery Methods.
To process Ship Express orders
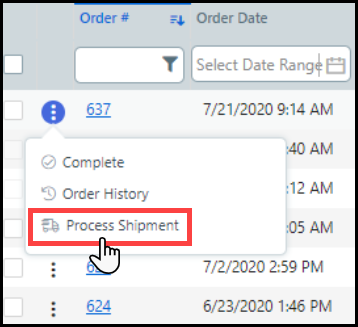
1 Go to Administration > Order View.
2 On the Order View, locate the order to execute, hover on the three dots and click Process Shipment.
Ship Express will open in a separate browser window. You will be logged in automatically, and the screen will be auto-populated with details for the job.
For more information on the features and functionality in Ship Express, consult the Ship Express User Guide and the Ship Express Admin Guide, which you can access from a link within the Ship Express application.
3 Locate the order with the correct Ship To Reference and then click Select.
4 Follow the instructions in the Ship Express administration guide to pack the items in the order and prepare for shipment.
5 When you are satisfied with the shipment, click Process Shipment.
The Ship Express system will close, and the Order View page will be refreshed and order status for the processed order will be changed to Shipped.
After an order has been processed in Ship Express, the Process Shipment button is replaced with an Open Shipment button. You can click the Open Shipment button to open a shipment already processed in Ship Express and re-print labels or the packing list or cancel the shipment.
Cancel a Ship Express shipment
1 Go to Administration > Order View.
2 On the Order View, locate the order to cancel, hover on the three dots and click Open Shipment.
3 In the Ship Express window, which will be auto-populated with the shipment details, click Cancel Shipment.
The shipment will be canceled, and the Order Status will change to Printed. The operator can re-ship the order by clicking Process Shipment again on the Order View.
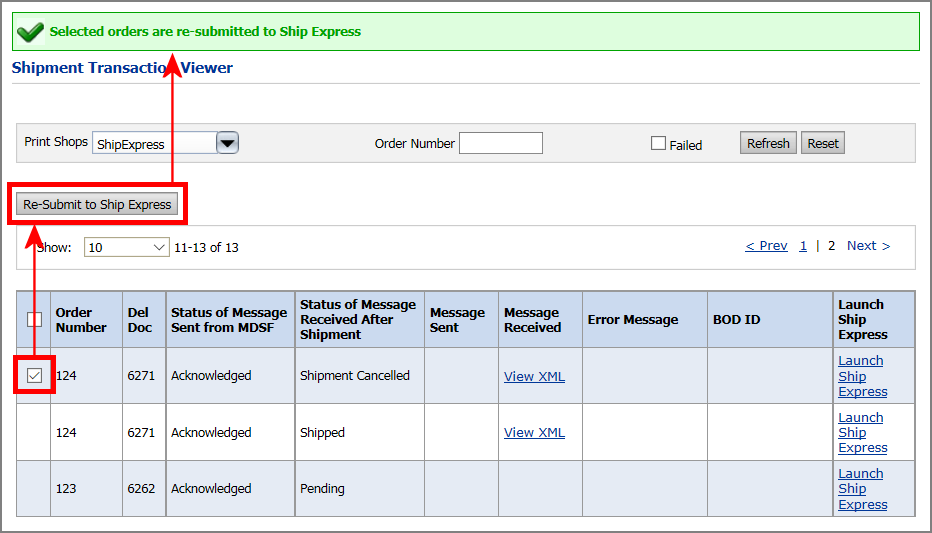
The Shipment Transaction Viewer provides access to information on every shipment on your site that was processed through Ship Express.
1 Go to Administration > Shipment Transaction Viewer.
2 You can use the fields in the search bar to help you locate the order transaction you want to view.
To show all transactions in the system, clear the Failed checkbox and click Refresh.
● Print Shops: Select the Ship Express associated Print Shop with the order(s)you want to view.
● Order Number: Specify the order number if you want to view transaction information for a specific order.
● Failed: Select this option if you want to limit your search to those transactions that failed.
● Click Refresh to execute your search (i.e., update the transaction view table with your search results), or click Reset to clear your search information and reset the search bar fields.
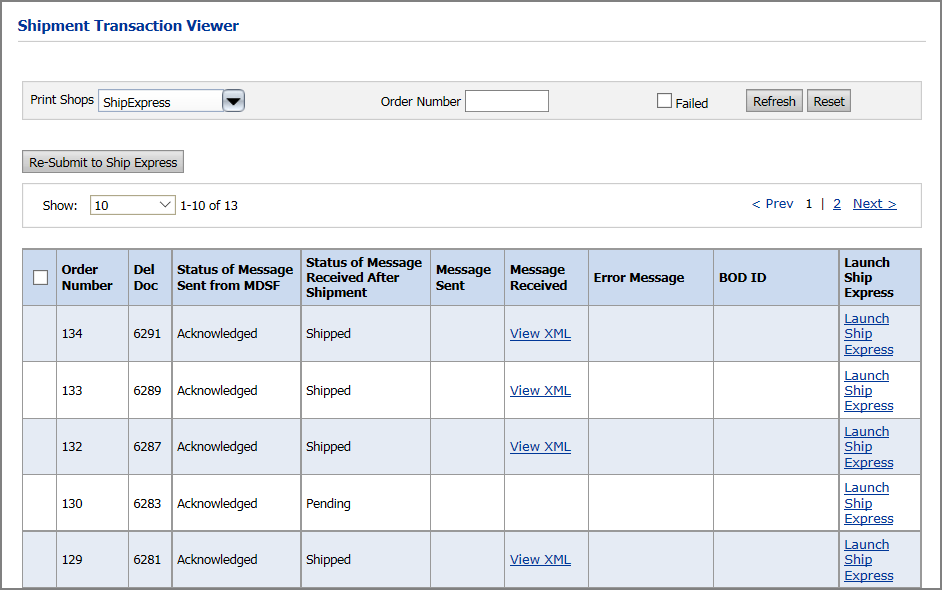
3 Click Launch Ship Express at any time to open Ship Express in a new browser tab.
4 Click View XML to open a Message window showing the XML for the transaction.
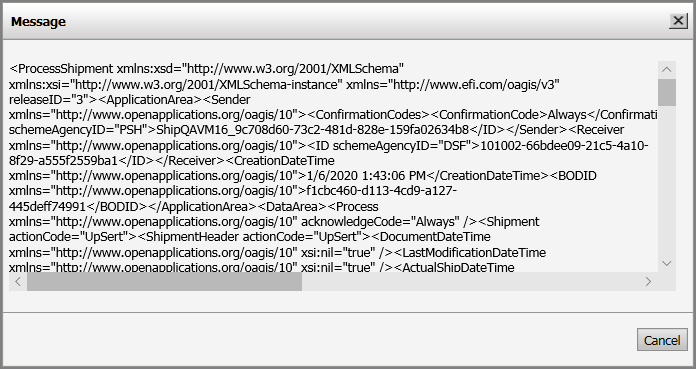
● Click Cancel to close the Message window.
5 To resubmit an order (e.g., a canceled) order, select the order and then click Re-Sumbit to Ship Express.