With MarketDirect StoreFront’s optional Cross Media Marketing (CMM), you can create variable data cross media marketing campaign products (with image personalization) that your buyers can use to run high-impact, multiple-channel campaigns to extend the scope of their traditional marketing strategies, reach wider audiences, and enhance communication with their current customer base via personalized marketing communications. A CMM campaign contains some combination of media elements: printed materials, e-mail messages, SMS (text messages), non-print products, and personalized URLs (PURLs).
The
Cross Media Marketing is a licensable option. If you already have a license
for both MarketDirect StoreFront
and Cross Media, this license for the integration is offered at no cost
(although the license is still required).
Note that Graphic Communications does not host Cross Media server software.
Thus, whether you are a self-hosted or Graphic Communications hosted site,
to use Cross Media, you will have to provide your own environment for
the Cross Media server.
For information on obtaining a license for Cross Media and/or the
Cross Media server software (used for creating Cross Media campaigns),
please contact your Graphic Communications sales representative.
Cross Media Marketing campaign products are not currently supported on mobile devices.
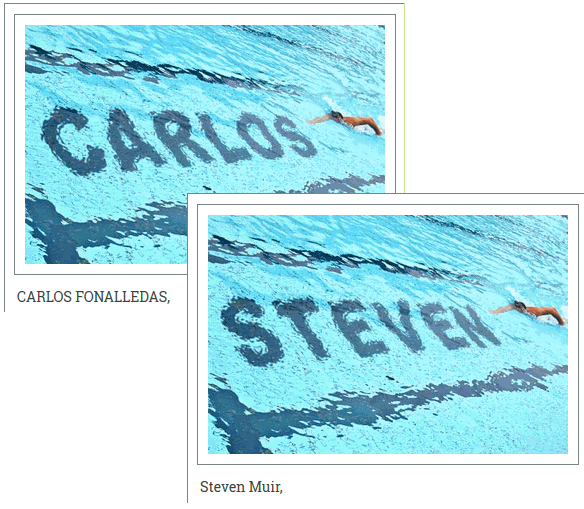
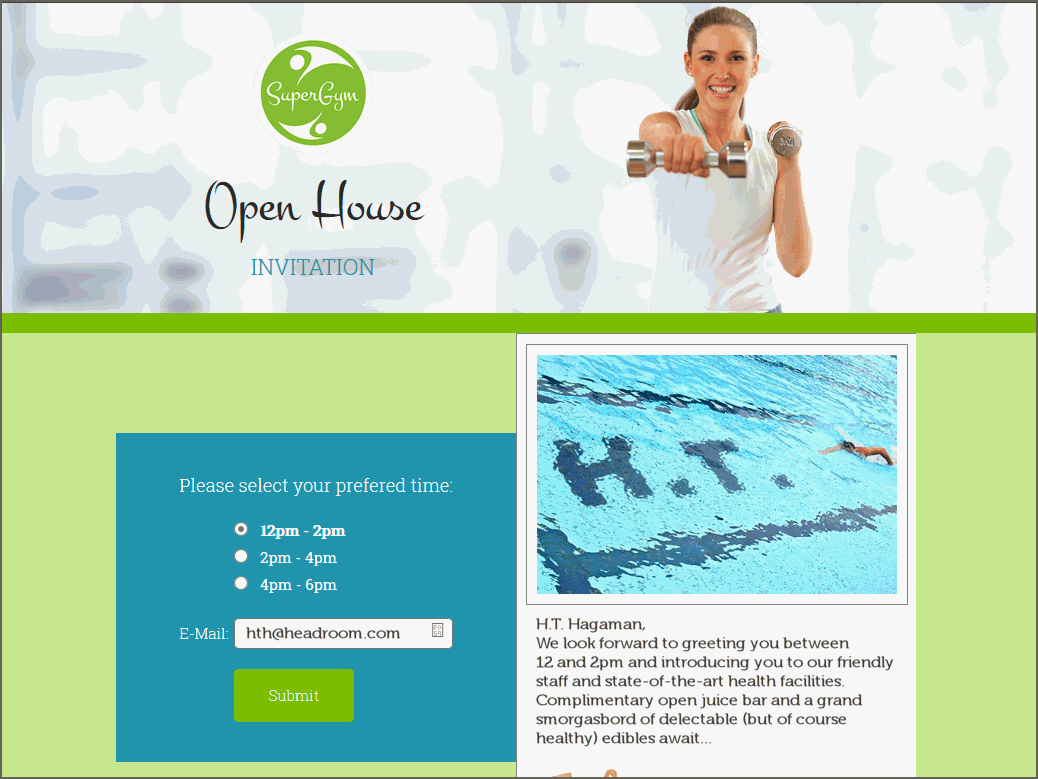
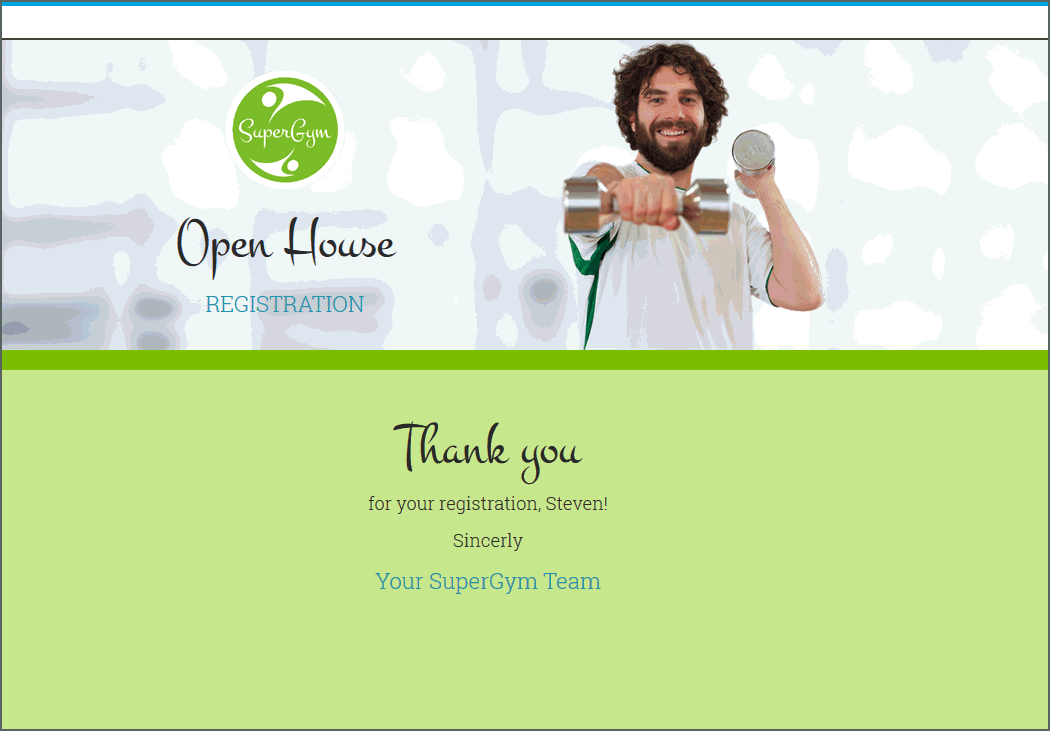
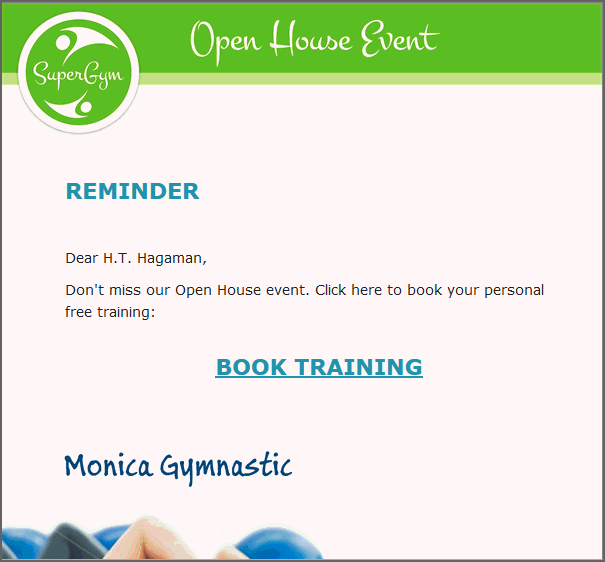
Example of image personalization:
To verify that you are licensed for Cross Media Marketing, go to Administration > License and ensure that the Cross Media option is selected.
You can use the powerful campaign setup tools to offer a variety of campaign products – from a simple a one-touch campaign buyers can use to promote a clearance sale with a personalized postcard and email blast to a list of customers to a complex multiple-touch cross media marketing campaign that involves all 5 campaign elements:
● Print (e.g., variable data printed personalized postcards with a web address and/or QR code that opens a personalized web page)
● Email (e.g., a targeted email blast with product offerings personalized for the customer)
● Web portals (e.g., general and personalized web page URLs with special offers)
● SMS text messages (e.g., cell phone text messages personalized with products of interest to the buyer based on historical data or survey results)
● Fulfillment items (e.g., non-printed products such as a coffee cup, t-shirt, or pen as a free gift for campaign targets who fill out a web form)
The objective: You want to offer buyers a state-of-the-art way to reach their customers through personalized multi-channel marketing campaigns to drive sales, market services, introduce new products, announce time-limited discounts, promote special offers, and engender customer and brand loyalty. They want to make use of all major communication media (print, web, email, and SMS).
The solution: You can use MarketDirect StoreFront’s CMM module to create campaign products that your buyers can use to run sophisticated marketing campaigns.

 Integrate
Your Site with the Cross Media Server
Integrate
Your Site with the Cross Media ServerOnce you have verified that you are licensed for Cross Media, your next step is to set up the integration between MarketDirect StoreFront and Cross Media.
1 Go to Administration > MarketDirect VDP Configurations (under the Platform Settings heading).
2 On the VDP Configuration page, MDXM Configurations tab, configure the following settings:
If your site is Graphic Communications hosted, you will need to contact support and provide them with your Cross Media server URL and admin public and private keys, which you will generate following the steps below.
● MDXM server URL: Enter the URL for your Cross Media server. This is the public URL of the MDXM server.
In most cases, you will be given
the MDXM server URL and the admin public and admin private keys by
the MarketDirect team after they install the Cross Media software.
You can generate the keys manually following the steps below.
How to generate the Admin Public and
Admin Private keys:
You can generate admin public and private keys only
on the local server (i.e., where your Cross Media
Designer is installed).
On the MDXM server:
(1) Open a web browser and access the following URL: http://localhost/api/admin/createserveradminaccount/[ANY
Description in Here]
Replace
[Any_Description_in_Here] in the URL with a description of your choice.
(2) After
you accessed the URL, the keys will be shown between the XML tags.
You can see a list of all created keys for the local server at this
URL: http://localhost/webapi/showalladmintokens.html
(3) If you are a self-hosted site,
enter the keys in the fields below.
If you are an
Graphic Communications hosted site, send the keys to the
support team.
● MDXM AdminPublic Key: Enter the administrator public key for the cross media server.
● MDXM Admin Private Key: Enter the administrator private key for the cross media server.
3 Click Test to test the connection with the cross media server.
4 Click Resync Account Settings to update the account information in the cross media database.
Whenever a new user creates a campaign in MarketDirect StoreFront, a unique account is created for that user in the cross media database. The account has a “Call back url” fetched from the Site Settings > Connectivity > External Site Url setting in MarketDirect StoreFront along with the MarketDirect StoreFront site Guid information. If the external site URL or Site Guid change settings change in MarketDirect StoreFront (e.g., by making the MarketDirect StoreFront site secure/non-secure), you will have to resynchronize account settings in MarketDirect StoreFront to synchronize the cross media accounts accordingly.
5 Click Save.
Step
1: Define the Campaign ProductBefore you begin creating the design templates for the elements in your campaign, you should spend a little time planning the campaign product. What elements will the campaign product include?
● Print: Will the product include the option of a printed piece such as a personalized postcard or mailer?
● Email: Will the product include an option to send a targeted email blast with product offerings personalized for the customer?
● Web: Will the product include a general and personalized web page with special offers or product information?
● SMS: Will the product include text messages such as reminders to register and receive a free gift or thank respondents for registering?
● Fulfillment item(s) (non-printed product): Will the product include a fulfillment item (i.e., a non-printed product (NPP) such as a coffee mug or pen)?
The campaign below requires all five types of campaign elements: print, email, web, SMS, non-printed product (NPP).
● Activity 1:
● VDP printed postcard mailed to prospects to induce them to register on the company web site to receive a free gift
● Postcard contains a QR code that takes prospects to a personalized web page (PURL)
● PURL contains a web form users can fill out to receive a free promotional gift (non-printed or fulfillment product)
● Activity 2:
● Follow-up Email sent to Activity 1 responders with time-limited offer for sales event
● Send Fulfillment gift (e.g., a coffee mug, non-printed product in MarketDirect StoreFront) to Activity 1 responders.
● Activity 3:
● SMS text message sent to Activity 1 responders and non-responders the day before the sales event with 10% off coupon code.
Step
2: Create Design Templates for the Campaign Media
ElementsOn the Cross Media Marketing server, create the design templates in the Cross Media Designer for each media element you will offer in the campaign product.
For detailed instructions on how to create campaign element design templates in the Cross Media Designer, see the Cross Media online help.
Campaigns can also include a fulfillment media element. You can map any non-printed product (NPP) in MarketDirect StoreFront in a campaign (e.g., a free gift such as a pen or other promotional item for those who register on the web site). You will map these products to the appropriate fulfillment campaign element on the Media Configuration (Template Media Elements) page when you are creating the campaign product (described later in this help topic).
● For instance, create the VDP post card template.

● Create the personalized web pages (PURL) or generic web pages (GURL).
● Create the email blast template.
● Create the SMS text message template.
Step
3: Create the Campaign Product and Publish It on the StorefrontAfter you have created design templates in the Cross Media Designer for all the media elements (print, web, email, SMS) that will be included in the campaign product, the next step is to create the product in MarketDirect StoreFront that you publish and make available to buyers.
For complete details on creating and publishing products in MarketDirect StoreFront, see Create Products. The steps below assume that you are familiar with the product creation process and need only a high-level overview that highlights those parts of the process that are unique to creating campaign products.
Note that a campaign product itself cannot be assigned a price. Only the individual products that make up the campaign product can be priced.
As you create the campaign product in MarketDirect StoreFront, you must create a corresponding product for each individual campaign elements in the campaign—i.e., for printed pieces (VDP documents), emails, and SMS text messages—as part of the process of developing the campaign product.
MarketDirect StoreFront has four campaign-specific product types to support CMM campaigns:
● Print (e.g., variable data printed postcard, business card, door hanger, poster, brochure, flyer)
The product type for a printed campaign
element in MarketDirect StoreFront
is MDXMDocument.
There are four campaign-specific product types in MarketDirect StoreFront
related to CMM campaigns:
●
MDXMCampaign: The campaign
product that buyers will order.
●
MDXMDocument: The product
type for any printed materials in the campaign.
●
MDXMEMail: The product type
for any emails in the campaign.
●
MDXMSMS: The product type
for any SMS text messages in the campaign.
Campaigns can also include a fulfillment media element. You can map
any non-printed product (NPP) in MarketDirect StoreFront
in a campaign (e.g., a free gift such as a pen or other promotional
item for those who register on the web site). You will map these products
to the appropriate fulfillment campaign element on the Media Configuration
(Template Media Elements) page when you are creating the campaign
product (described later in this help topic).
● Email (e.g., a targeted email blast with product offerings personalized for the customer)
The product type for a printed campaign element in MarketDirect StoreFront is MDXMEMail.
● SMS text messages (e.g., cell phone text messages personalized with products of interest to the buyer based on historical data or survey results).
The product type for a printed campaign element in MarketDirect StoreFront is MDXMSMS.
● Web portals (e.g., personalized web page URLs with special offers)
The web portal campaign element does not have a corresponding product type in MarketDirect StoreFront because it is a static element of the campaign (rather than an activity).
To create the campaign product and campaign element products
1 Go to Administration > Products.
2 On the Manage Products page, click Create Product.
3 On the Create New page, enter a Product Name.
4 From the Type pull-down menu, select MDXMCampaign (the product type for CMM campaigns).
5 Click Next.
6 On the Product Information page, complete the fields as for any other product type.
For complete details on creating and publishing products in MarketDirect StoreFront, see Create Products.
7 Follow the steps below to complete the fields on the Details, Settings, and Security pages as you would for any other product type with the following exceptions:
8 On the Settings page, there are several fields in particular that you need to configure for campaigns:
● Supported Print Shops: If you want to restrict availability of the product to a specified Print Shop(s), you can click Add Supported Print Shops and then select the Print Shops that will support the product on the Assign/Edit Print Shops window.
● Allow Campaign Creation For: This field lets you specify whether a campaign buyer can use a shared corporate contact database or their own personal contact database (i.e., this is a contact list). The options are:
● All: Lets the buyer choose when creating the campaign whether to use a shared corporate contact list or their own personal contact list.
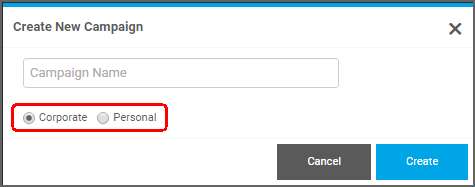
● User Account Only: Specifies that buyers can only use their own personal contact list when creating the campaign.
● Company Accounts Only: Specifies that the buyer can only use a shared corporate contact list when creating the campaign.
● Direct Mail Jobs: This field lets you specify an external mailing service provider (AccuZIP) for printed materials (print products) in the campaign. The mailing services will apply only to printed material campaign elements, not to email, SMS, or non-printed product (NPP) parcels.
Although non-print product (NPP) parcels can be included in a campaign, the postage and handling will not be calculated for direct mail.
By design, direct mail pieces are never subject to handling fees. They are governed by postage and postage markup and fees you specify.
These settings and the information
in this section apply only to Print Shops
in the United States who have an AccuZIP account (which is valid only
in the US). AccuZIP is available only in the United States and in
English language.
If you are not in the US or are in the US but do not have an AccuZIP
account set up in MarketDirect StoreFront,
skip to the next numbered step in this section and continue setting
up your campaign product. You will set pricing for postage for all
printed pieces in the campaign at the product level when you create
products for the printed pieces (described in this section below when
you reach the Media
Configuration (Template Media
Elements) page).
For details on integration with
AccuZIP, see Mailing
Service Providers.
For more information on AccuZIP or to establish an account, visit www.accuzip.com/dsf.
● If you are in the United States and have purchased and configured the AccuZIP integration option:
● Go to Administration > Mailing Service Providers and ensure the mailing service provider account is enabled and active.
● Go to Administration > Print Shops:
For details on setting up direct mail for a Print Shop, see Direct Mail.
● In the Supported Delivery Methods field, if you are not using the delivery methods from an integrated MIS, make sure "USPS First Class" and "USPS Standard Mail" are listed as supported delivery methods for the Print Shop.

If they are not listed, click Assign/Edit Delivery Methods and select them.
● In the Mailing Service Provider Account field, make sure the direct mail account is selected.
● If you are not using the default delivery method from an integrated MIS, in the Default Shipping Method for Direct Mail (Standard) field, make sure "USPS Standard Mail" is selected.
● If you are not using the default delivery method from an integrated MIS, in the Default Shipping Method for Direct Mail (First Class) field, make sure "USPS First Class" is selected.
● Back on the Product | Settings page:
● Select the Support External Mailing Service Provider checkbox. If you enable this option, you will have the option of having AccuZIP either calculate postage (e.g., when you upload a CSV file with addresses) or run the EDDM (Every Day Direct Mail) service.
The United States Postal Service (USPS) typically offers two types of mailing services, standard and first class.
● Support EDDM: Select this option if you want to support Every Door Direct Mail (EDDM) services for the product mailings.
For information on EDDM, visit https://www.usps.com/business/every-door-direct-mail.htm.
● Support List Purchase: Select this option if you want buyers to be able to purchase a mailing list for the product.
There is a limit of 3,000 records for purchased lists.
AccuZIP mailing lists contain
an extensive array of data on mail recipients. See the List Codes
(PDF) for a comprehensive list of all available data. See the SampleOutput (CSV) for a sample output file.
For more information on setting up and managing mailing service
providers such as AccuZIP, see the topic Mailing
Service Providers.
IMPORTANT The direct mail automation workflow is optimized for 50,000 records or fewer.
● Override mailing service class: Select this option if you want to allow buyers to override the default mailing service class for the product.
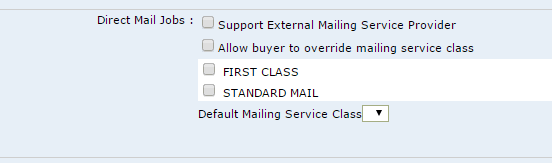
● FIRST CLASS: Select this option if you want to allow the buyer to choose First Class for the product.
● STANDARD MAIL: Select this option if you want buyers to use Standard Mail for the product.
● Default Mailing Service Class: Select the default mailing service class for the product.
You will probably want to allow buyers to override mailing service class only if the default mailing service class is Standard; buyers would thus be able to upgrade from Standard to First Class for better service at a higher cost. If the mailing service class is First Class, allowing buyers to override with Standard would result in lower cost but slower service, which would be a downgrade.
7. On the Product Information page, click Next.
8. On the Template Uploader page, select the method (mode) by which to import the campaign template:
● Select Template Mode: You have two options for associating the campaign template with your MarketDirect StoreFront campaign product:
● By ZIP: Uploads (imports) the template zip file from the MDXM (Cross Media Marketing) server to the MarketDirect StoreFront server:
The By
ZIP method is typically not as efficient as the By
Name method. With the By Zip method (1) the zipped file will
have to be transferred between servers three times, which is especially
significant for large files, and (2) when the campaign template is
changed on the cross media server, it will have to be imported again.
Using the By Name method, however, when the template is changed on
the cross Media
server, a notification is sent to the MarketDirect StoreFront
server that the template has changed and must be re-synchronized (not
re-uploaded because the template remains on the MDXM server and MarketDirect StoreFront links to it)..
Note that there is no incremental upgrade using the By ZIP method.
Thus, if the campaign template file is changed, you will have to create
a new product with the changed template file.
● Click Choose File.
● On the Open window, locate the campaign template file (i.e., that you copied from the MDXM server to your Digital StoreFont server).
● Click Open.
● Click Upload.
● By Name: Pulls the template file by name directly from the cross Media server.
● Name: Enter the name of the campaign file on the cross Media server.
● Secret Key: Enter the secret key associated with the campaign file. The secret key is generated when you export the file on the Cross Media Marketing server. Follow the steps below to generate the name and secret key you will need to enter in MarketDirect StoreFront to pull by name.
● After
creating the template, click ![]() > Export campaign.
> Export campaign.

● Select the Export to campaign templates option in the Export campaign window to generate the secret key.
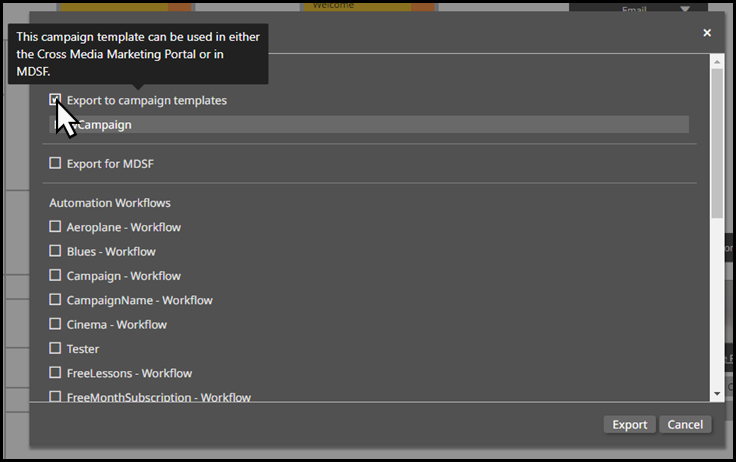
● Select an Automation Workflow to export with the campaign.
● Click Export to open the Export window where you will see the secret key.
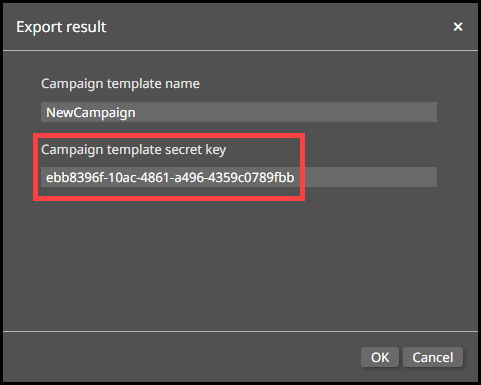
You can change the name of campaign in the Campaign template name field.
● Click OK.
● Click Sync Now to synchronize the file between the cross media server and the MarketDirect StoreFront server.
If you use the By
Name option, whenever you modify an existing activity, add a new
activity, or delete an activity in a campaign template on the cross
media server, you will receive a message in MarketDirect StoreFront
informing you that the template has changed and you need to re-sync
the template (by clicking Sync
Now).
If a new activity is added or an existing activity is changed so that
configuration is required in MarketDirect StoreFront
(i.e., by buyers), the product associated with that template will
not be able to be ordered on the buyer side until the template is
synced. If no buyer configuration is required in MarketDirect StoreFront
(for example, text is changed or an activity is deleted), the template
will not be blocked on the buyer side (i.e., buyers will be able to
order the campaign product).
● Template Activities: This section displays all design elements defined in the campaign template as defined in Cross Media.
● Name: You can modify the name of the campaign activity (as defined in the template) that will be shown to buyers.
● Description: You can modify the description of the campaign activity (as defined in the template) that will be shown to buyers.
● Activity Type: Read-only field that displays the type of activity as defined in the template.
● On Hold: Read-only field that indicates whether a buyer can specify a date when they want the activity to start (i.e., delay it until a specified date) as defined in the template.
Note that certain types of activities are never on hold. For example, PURLs (personalized URLs) are set to be active as soon as the campaign begins.
● True indicates that a design element is an activity. In this case, you can assign a product to it and buyers can put the activity on hold (or delay enacting it until a specified date).
● False indicates that a design element is not an activity. In this case, you cannot assign a product to it and buyers cannot put the activity on hold.
● Expected Percentage: You can specify an expected response rate for the activity. This projected rate is for calculating an estimated price for the subsequent activities only. For example, if the original price was calculated for 1,000 respondents and the expected response rate was 500, the price for the subsequent activity is calculated off of 500 (rather than 1,000).
9. Click Next.
10. On the Media Configuration (Template Media Elements) page, configure the elements in the campaign.
● Click
Click to expand to expand
(show detailed view) of all Media
elements, or you can click the caret icon  to expand
a single Media
element.
to expand
a single Media
element.
● In the expanded (or detail) view, you can edit the following fields:
● Name: Edit the name of the media element.
● Description: Edit the description of the media element.
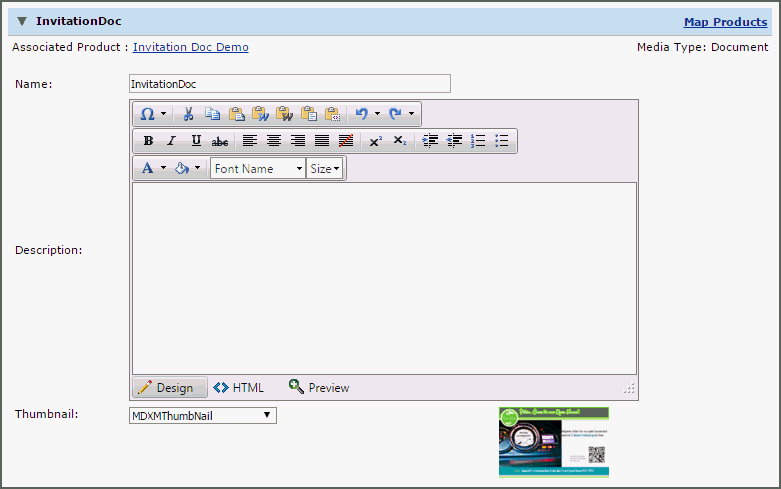
● Thumbnail: Change the thumbnail image associated with the media element by selecting from the pull-down list.
● None: uses no thumbnail for the Media element product.
● MDXM Thumbnail: uses the thumbnail specified in the Cross Media template.
● Associated Product Image: uses the thumbnail specified in the MarketDirect StoreFront product builder.
● User Uploaded Image: lets admins upload their own images for the product.
● To associate (map) a product with a media element:
Campaign Media elements will typically
be of the one of the following media types:
●
Dashboard
●
Document
●
Fulfillment
●
Mail
●
Personal Page
●
Purl
●
SMS
You can map a product to the following media element types:
●
Document
●
Fulfillment: You can map any non-printed product to a fulfillment
media type.
●
Mail
●
SMS
Campaigns can also include a fulfillment media element. You can map
any non-printed product (NPP) in MarketDirect StoreFront
in a campaign (e.g., as a fulfillment item such as a free gift such
as a pen or other promotional item for those who register on the web
site). You will map these products to the appropriate fulfillment
campaign element on the Media Configuration (Template Media Elements)
page when you are creating the campaign product (described later in
this help topic).
If no product is associated with the Media
element, the Associated Product
field will read "No Product Associated." If a product is
associated with the media element, the name of the product will be
shown. Note that clicking Associate
Product opens the associated product in a separate browser
window.
● Click Map Products for the first product with no product associated.
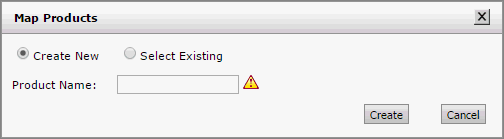
● You can either create a new product or associate the media element with an existing product.
● To create a new product to associate with the media element:
● Click Create New.
The product builder for the new product will open in a separate browser window.
● Enter a name for the new product in the Product Name field.
● Click Create. The product builder will open in a separate browser window (leaving the campaign product window open) to the Product Information page.
● Configure the product Information, Details, and Settings as needed as you would for any other product.
● Configure Pricing for the campaign product.
Setting pricing for the product
is especially important because the campaign product itself is not
priced and thus pricing of a campaign product is calculated based
on the individual products that comprise it.
If you are not in the US or are in the US but are not using a mailing
service provider, you will set a price for mailing printed pieces
in the campaign in the Postage Cost
section of the Pricing page so that MarketDirect StoreFront
will calculate the mailing costs. The Regular
Price you set will be how much the customer is charged for
each piece of mail that is sent. This is a flat per-piece charge.
The Additional Charges field
will not be used if you are not using a mailing service provider (so
any values in that field will be disregarded).
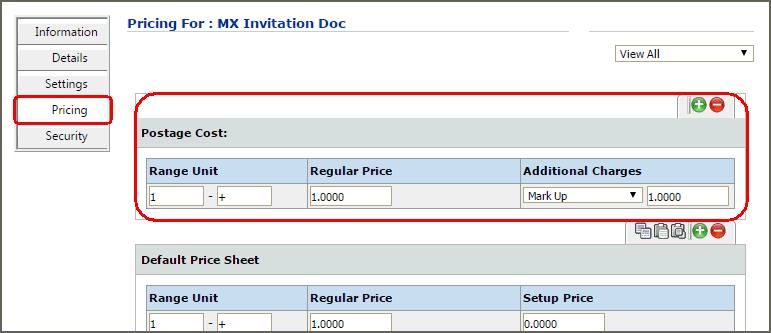
By design, direct mail pieces are never subject to handling fees. They
are governed by postage and postage markup and fees you specify.
If you are using a mailing service
provider integrated with MarketDirect StoreFront,
any value in the Postage Cost
| Regular Price field will
be disregarded but the Additional
Charges field will be used. You can specify Additional
Charges (e.g., to cover handling and materials) when pricing
any product set up for direct mail. You can choose from the following
options to mark up or mark down the AccuZIP-calculated postage.
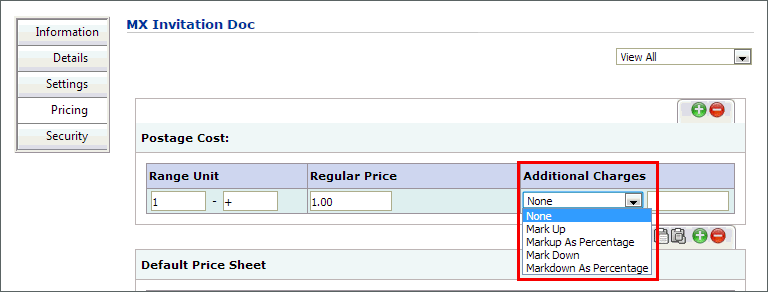
●
Mark Up: Specify a specific
amount to add to the regular price for each piece.
● Markup As Percentage:
Specify a percentage to add to the regular price for each piece.
● Mark Down: Specify
a specific amount to deduct from the regular price for each piece.
● Markdown As Percentage:
Specify a percentage to deduct from the regular price for each piece.
For complete details on creating and publishing products in MarketDirect StoreFront, see Create Products.
● Configure the product Security as needed as you would for any other product.
● To map the media element with an existing product:
● Click Select Existing. You can select any product already defined in MarketDirect StoreFront that matches the product type.
● On the Map Products window, select the product to map to the media element.
The Map Products window lists only those products defined in MarketDirect StoreFront that correspond to the media element type. Thus, you can select any product listed in the Map Products window.
● Click Associate.
● Repeat the process of mapping products (creating new products or associating existing products) until all products in the campaign have an associated product.
11. Click Finish.
12. On the Product Complete page, click Publish It.
13. On the Select Target Category window, select the category in which to publish the campaign product.
14. Click Publish.
15. Click Done.
16. Go to the Storefront and test the product.